If you're using Blogger as the platform for your personal or business blog, you're probably looking for ways to customize it and make it your own. This way, you'll make your webpages unique and eye-catching and ensure they'll stand out from the many other pages on the internet. You'll also grab the attention of your target market, encourage them to browse through your blog and become your loyal readers and followers.
Fortunately, there are lots of ways to personalize your Blogger blog, and one of these is to customize your Popular Posts widget. Haven't installed this yet? Don't worry since putting it in your blog easy.


Once you've followed these instructions, you'll get to see the basic version of the Popular Posts Widget for Blogger in your blog. You can stick with this if it matches your blog design but, if it sticks out like a sore thumb or doesn't suit your taste, there's no need to fret since you can personalize it. You can choose from the following styles - see the demo blog:

CSS code:
 CSS code:

CSS code:

CSS code:

CSS code:
These next codes need to be pasted above the "</head>" or "</body>" tags, so check the instruction to know exactly where you need to put the code.

Important: If the Popular Posts widget is located in the footer of your blog, remove the .sidebar class found in the CSS code in order to make it work.
Please note that most of the styles are using the Oswald font which you need to add to your template's code as well.
So, search for this tag:
Once you have added all the codes in the right place, press the "Save template" button to save the changes.
That's it!
The five Popular Posts widgets for Blogger featured today are all great solutions for adding a popular post section to your blog. They all have different appearance for determining what makes a post popular, but the end result is the same: visitors are always one click away from your best content. Try some of these styles, find your favorite, and see how it impacts the performance of your blog.
Fortunately, there are lots of ways to personalize your Blogger blog, and one of these is to customize your Popular Posts widget. Haven't installed this yet? Don't worry since putting it in your blog easy.

Adding the Popular Posts Widget for Blogger
Just click on your blog title, access the Layout menu, click "Add Widget" and choose "Popular Posts". A window will appear asking you to configure the widget by choosing which posts you'll feature (e.g. those that were most viewed in the past 7 days or 30 days or from the beginning of your blog). You'll also be asked to choose how many posts you'll feature in your Popular Posts section and select if you'll show the post title only or along with the image thumbnail and/or the snippet. (Remember that each widget style has different requirements, so follow the instructions carefully to know if you'll need the snippet and image thumbnail or not).Once you've followed these instructions, you'll get to see the basic version of the Popular Posts Widget for Blogger in your blog. You can stick with this if it matches your blog design but, if it sticks out like a sore thumb or doesn't suit your taste, there's no need to fret since you can personalize it. You can choose from the following styles - see the demo blog:
Popular Posts Style 1 - Box within a box
This is an interesting widget style since it uses your snippet and image thumbnail in a unique way. Your snippet is written in opaque text and placed in a small transparent box. This, in turn, is placed in a bigger rectangular box, wherein your image thumbnail is used as a background. Choosing this Popular Posts Widget for Blogger can be a great option if you want to brighten up your blog and grab the attention of readers with your colorful photos.CSS code:
<style type='text/css'>
.sidebar .PopularPosts ul {
margin: 0;
padding: 0;
}
.sidebar .PopularPosts ul li {
list-style: none !important;
padding: 0 !important;
margin-bottom: 10px;
}
.sidebar .PopularPosts .item-thumbnail {
height: 190px;
margin: 0;
overflow: hidden;
width: 100%;
}
.sidebar .PopularPosts .item-title {
position: relative;
}
.sidebar .PopularPosts img {
height: 100%;
width: 100%;
object-fit: cover;
}
.sidebar .PopularPosts .item-title a {
color: #FFFFFF;
font: 15px 'Oswald', sans-serif;
text-transform: uppercase;
font-size: 20px;
padding: 10px;
position: absolute;
right: 0;
left: 0px;
margin: 0px auto;
text-align: center;
text-decoration: none;
top: 40px;
width: 60%;
height: 26px;
overflow: hidden;
z-index: 2;
}
.sidebar .PopularPosts .item-snippet {
background: rgba(0, 0, 0, 0.35);
border-top: 6px solid rgba(0, 0, 0, 0.1);
border-bottom: 6px solid rgba(0, 0, 0, 0.1);
color: #FFFFFF;
left: 0px;
right: 0px;
margin: 0px auto;
padding: 65px 10px 10px;
position: absolute;
font: 13px "Times New Roman",Times,FreeSerif,serif;
text-align: center;
top: 35px;
width: 60%;
z-index: 1;
}
.sidebar .PopularPosts .item-content {
position: relative;
}
</style>
Popular Posts Style 2 - Large thumbnails with small post titles underneath
This uses the same code as the basic Blogger Popular Posts Widget with a few tweaks. Popularized by well-known blogs, this style is eye-catching because it focuses on pictures, which don't only summarize the posts' content but also add visual drama to the entire page. This is particularly useful for blogs that focus on clothes, makeup, art and other topics that highly depend on visual presentation to better express ideas.<style type='text/css'>
.sidebar .PopularPosts ul {
counter-reset: popularcount;
margin: 0;
padding: 0;
}
.sidebar .PopularPosts ul li {
width: 100%;
list-style: none !important;
padding: 0 !important;
margin-bottom: 20px;
position: relative;
border: 0;
}
.sidebar .PopularPosts .item-thumbnail a {
clip: auto;
display: block;
height: auto;
height: 120px;
}
.sidebar .PopularPosts .item-thumbnail {
width: 100%;
position: relative;
margin-bottom: 15px;
}
.sidebar .PopularPosts .item-thumbnail::before {
background: rgba(0, 0, 0, 0) none repeat scroll 0 0;
border-bottom: 29px solid #fff;
border-left: 29px solid transparent;
border-right: 29px solid transparent;
bottom: 0px;
content: "";
height: 0;
width: 0px;
left: 0px;
right: 0px;
margin-left: auto;
margin-right: auto;
position: absolute;
z-index: 3;
}
.sidebar .PopularPosts .item-thumbnail:after {
color: #000;
content: counter(popularcount, decimal);
counter-increment: popularcount;
font: 13px "Times New Roman",Times,FreeSerif,serif;
list-style-type: none;
position: absolute;
bottom: 0;
text-align: center;
margin: 0px auto;
left: 0px;
right: 0px;
z-index: 4;
}
.sidebar .PopularPosts .item-thumbnail img {
position: relative;
width: 100%;
height: 120px;
object-fit: cover;
}
.sidebar .PopularPosts .item-title {
font: 15px 'Oswald', sans-serif;
text-transform: uppercase;
text-align: center;
margin: 0px auto;
padding-bottom: 10px;
border-bottom: 1px solid #000;
}
.sidebar .PopularPosts .item-title a {
color: #000;
text-decoration: none;
}
.sidebar .PopularPosts .item-snippet {
padding: 10px 15px;
font: 13px "Times New Roman",Times,FreeSerif,serif;
text-align: center;
}
</style>
Popular Posts Style 3 - Colorful boxes
If your blog needs a pop of color, this is the right choice for you. This widget style presents your Popular Posts in several boxes that feature a thumbnail image and have bright, eye-catching shades like light green, ocher yellow and vivid orange. Each box has a different color, and you can add up to four boxes.CSS code:
<style type='text/css'>
.sidebar .PopularPosts ul {
padding: 0;
margin: 0;
}
.sidebar .PopularPosts .item-thumbnail a {
clip: auto;
display: block;
height: auto;
overflow: hidden;
}
.sidebar .PopularPosts .item-thumbnail {
width: 130px;
height: 130px;
border-right: 5px solid #fff;
margin: 0px 10px 0px 0px !important;
position: relative;
}
.sidebar .PopularPosts .item-thumbnail img {
position: relative;
height: 100%;
width: 100%;
object-fit: cover;
}
.sidebar .PopularPosts ul li {
float: left;
margin-bottom: 5px;
max-height: 130px;
min-width: 250px;
overflow: hidden;
}
.sidebar .PopularPosts ul li:first-child {
background: #D9EDF7;
}
.sidebar .PopularPosts ul li:first-child + li{
background: #F2DEDE;
}
.sidebar .PopularPosts ul li:first-child + li + li {
background: #DFF0D8;
}
.sidebar .PopularPosts ul li:first-child + li + li + li {
background: #FFEEBC;
}
.sidebar .PopularPosts ul li:first-child + li + li + li + li{
background: #E0E0E0;
}
.sidebar .PopularPosts .item-title {
font: 13px 'Oswald', sans-serif;
text-transform: uppercase;
padding: 10px 5px 10px;
}
.sidebar .PopularPosts .item-title a {
color: #000;
text-decoration: none;
}
.sidebar .PopularPosts .item-snippet {
font: 13px "Times New Roman",Times,FreeSerif,serif;
padding-right: 5px;
}
.sidebar .PopularPosts .widget-content ul li {
padding: 0px 5px 0px 0px!important;
}
</style>
Popular Posts Style 4 - Grid layout
Just like the large-picture widget style, the grid layout is an excellent option if you want to showcase your pictures or if your blog depends on visual information. However, the title of your posts won't be included in the layout, so readers will have to hover their mouses on the images to read the titles.CSS code:
<style type='text/css'>
.sidebar .PopularPosts ul {
padding: 0;
}
.sidebar .PopularPosts ul li:first-child{
width: 100%;
max-height: 100%;
opacity: 0.9;
}
.sidebar .PopularPosts ul li:nth-child(even){
margin-right: 2%;
}
.sidebar .PopularPosts ul li {
box-sizing: border-box;
position: relative;
padding: 0px !important;
width: 49%;
max-height: 120px;
opacity: 0.4;
overflow:hidden;
float: left;
margin-bottom: 2%;
-webkit-transition: all 0.5s ease 0s;
-moz-transition: all 0.5s ease 0s;
-ms-transition: all 0.5s ease 0s;
-o-transition: all 0.5s ease 0s;
transition: all 0.5s ease 0s;
}
.sidebar .PopularPosts ul li:hover {
opacity: 1;
}
.sidebar .PopularPosts .item-thumbnail {
margin: 0;
width: 100%;
}
.sidebar .PopularPosts ul li img {
box-sizing: border-box;
width: 100%;
height: 100%;
object-fit: cover;
padding:0;
}
.sidebar .PopularPosts .item-content:hover .item-title a,
.sidebar .PopularPosts .item-thumbnail-only:hover .item-title a {
visibility: visible;
opacity: 1;
}
.sidebar .PopularPosts .item-title a {
color: #fff;
background: rgba(0, 0, 0, 0) linear-gradient(to bottom, rgba(0, 0, 0, 0) 0%, rgba(0, 0, 0, 0.93) 100%, rgba(0, 0, 0, 0.85) 100%);
text-decoration: none;
position: absolute;
text-align: center;
font: 13px 'Oswald', sans-serif;
left: 0;
right: 0;
bottom: 0%;
padding: 100px 10px 10px;
opacity: 0;
visibility: hidden;
}
.sidebar .PopularPosts .item-snippet {
display: none;
}
</style>
Popular Posts Style 5 - Numbered posts
If you love numbered lists, or if you'd like to make your blog more organized, this can be the perfect option. By using the code for this widget style, your Popular Posts will be automatically numbered and will feature clean, minimalistic boxes that include your snippet and image thumbnail.CSS code:
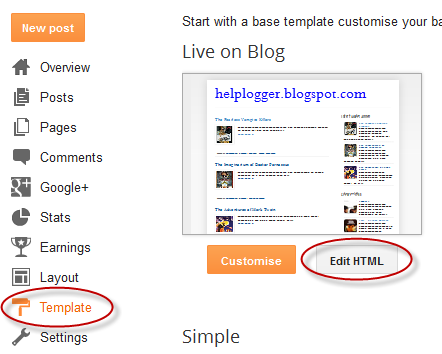
<style type='text/css'>These are just some of the widget styles you can choose from. When you've picked a style you want, make sure to copy its CSS code. Once you do so, go to your blog, click "Template" on the left side and select "Edit HTML" under the template preview.
.sidebar .PopularPosts ul {
counter-reset: popularcount;
margin: 0;
padding: 0;
}
.sidebar .PopularPosts ul li {
float: left;
max-height: 130px;
min-width: 250px;
position: relative;
}
.sidebar .PopularPosts .item-thumbnail::after {
color: rgba(255,255,255, 0.63);
content: counter(popularcount, decimal);
counter-increment: popularcount;
font: 70px 'Oswald', sans-serif;
list-style-type: none;
position: absolute;
left: 5px;
top: -5px;
z-index: 4;
}
.sidebar .PopularPosts .item-thumbnail::before {
background: rgba(0, 0, 0, 0.3);
bottom: 0px;
content: "";
height: 100px;
width: 100px;
left: 0px;
right: 0px;
margin: 0px auto;
position: absolute;
z-index: 3;
}
.sidebar .PopularPosts .item-thumbnail a {
clip: auto;
display: block;
height: auto;
overflow: hidden;
}
.sidebar .PopularPosts .item-thumbnail {
width: 100px;
height: 100px;
margin: 0px 10px 0px 0px !important;
position: relative;
}
.sidebar .PopularPosts .item-thumbnail:hover:before {
display: none;
}
.sidebar .PopularPosts .item-thumbnail img {
position: relative;
padding-right: 0px !important;
height: 100%;
width: 100%;
object-fit: cover;
}
.sidebar .PopularPosts .item-title {
font: 13px 'Oswald', sans-serif;
text-transform: uppercase;
padding: 0px 5px 10px;
}
.sidebar .PopularPosts .item-title a {
color: #000;
text-decoration: none;
}
.sidebar .PopularPosts .item-snippet {
font: 13px "Times New Roman",Times,FreeSerif,serif;
}
.sidebar .PopularPosts .widget-content ul li {
padding: 0px 5px 0px 0px !important;
}
.sidebar .PopularPosts .item-content {
padding: 5px 0px;
border-bottom: 1px dotted #dedede;
overflow: hidden;
height: 100px;
position: relative;
}
</style>
These next codes need to be pasted above the "</head>" or "</body>" tags, so check the instruction to know exactly where you need to put the code.
Adding the CSS
When the template editor has opened, click anywhere inside the code area and hit CTRL + F or Command F to search the following tag:</head>Just ABOVE the </head> tag, copy-paste the CSS code of one of the styles above.

Important: If the Popular Posts widget is located in the footer of your blog, remove the .sidebar class found in the CSS code in order to make it work.
Please note that most of the styles are using the Oswald font which you need to add to your template's code as well.
So, search for this tag:
<head>Just BELOW it, add this line:
<link href='https://fonts.googleapis.com/css?family=Oswald:400,700' rel='stylesheet' type='text/css'/>
Adding the JavaScript
These styles also require JavaScript codes in order to resize the popular posts image / thumbnail and trim the post snippet and title. To add the JavaScript, search the </body> tag and paste the following script just above it:<script src='//ajax.googleapis.com/ajax/libs/jquery/1.11.1/jquery.min.js'/>Note: if you have already the jQuery library in your template, remove the line in red.
<script type='text/javascript'>
$('.popular-posts img').attr('src', function(e, t) {
return t.replace('/s72-c/', '/s350-c/')
});
$('.popular-posts ul li .item-snippet').each(function(){
var txt=$(this).text().substr(0,60);
var j=txt.lastIndexOf(' ');
if(j>10)
$(this).text(txt.substr(0,j).replace(/[?,!\.-:;]*$/,'...'));
});
$('.popular-posts ul li .item-content a').each(function(){
var txt=$(this).text().substr(0,60);
var j=txt.lastIndexOf(' ');
if(j>=6)
$(this).text(txt.substr(0,j).replace(/[?,!\.-:;]*$/,'...'));
});
</script>
Once you have added all the codes in the right place, press the "Save template" button to save the changes.
That's it!
The five Popular Posts widgets for Blogger featured today are all great solutions for adding a popular post section to your blog. They all have different appearance for determining what makes a post popular, but the end result is the same: visitors are always one click away from your best content. Try some of these styles, find your favorite, and see how it impacts the performance of your blog.